Driver Address Ball
Clubhead Position Behind Ball At Address. I was amazed to notice that you position the face of the club well back of the ball on your driver too.
Address the Ball at the perfect distance. The space between golfer and ball at address helps determine the distance between golfer and ball after.
Address Setup: Stance, Posture and
Click on any of the hyperlinks to rapidly
navigate to another section of the review:
Homepage index ; overview; grip;
impact; followthrough-to-finish
One characteristic feature of a golf swing is
the fact that a golfer swings the club across the front of the body, while
the body is aligned at right angles to the ball-target line. That fact makes
it difficult to aim accurately. Another complicating issue is the fact that the clubhead moves on an inclined swing path that is tilted
approximately 45 degrees from the horizontal, and the body has to swivel
around in such a manner that the ideal swingpath is consistently realised. Because the body s
and subsequent movement is subservient to the clubhead s ideal swingpath, the body has to
adopt a stance and posture at address, that will allow a perfect swingpath to occur
naturally and consistently from swing-to-swing.
When watching a PGA tournament on TV, I
always admire the athletic posture and perfect body alignment of PGA tour
players as they get into their address position. PGA tour players always
appear to have the correct body angles at setup and their lively posture
gives them an enviable aura of athleticism. They
appear to be in a state of perfect readiness to be able to swing the club at
high velocity while maintaining perfect coordination and perfect balance throughout the swing. This
section of the review will examine their approach to the address setup,
dealing with the body s position at address, with a major focus on stance,
body posture, ball position and body alignment
Consider the appearance of a world-class PGA
Aaron Baddeley - from reference number 1
One can sense the pure athleticism of Aaron
Baddeley s setup posture. He seems perfectly poised to start the backswing.
He appears to be in perfect balance and also perfectly aligned relative to
the ball-target line. There appears to be a sense of liveliness in his
stance that will allow his body to move fluidly during the swing.
The same perfect posture can be seen in Nick
Faldo s address position - using a short iron when using a short iron,
Faldo has a slightly more bent-over posture and his arms hang down
more vertically from the shoulders causing his hands to be closer to his thighs.
Faldo at address- from reference number 2
There are so many features of Nick Faldo s
address position that are perfect -- foot stance width, degree of bend in
the knees more flexed than Aaron Baddeley s, degree of forward bend at the waist, straight lower back,
slightly rounded upper back, head in line with the spine, arms hanging
naturally down from the shoulders, hands close to the body, hands slightly
forward of the ball in the face-on view, head behind the ball in the face-on
view, slight tilt of the spine to the right causing the right shoulder to be
lower than the left shoulder, nose tilted to the right as the head turns
slightly to the right in sympathetic alignment with the spine tilt, body weight
seemingly centralised over the mid-feet down-the-line view and between the
In the following section of the review, I
will provide detailed advice on how a golfer can best mimic Faldo s perfect address
Getting started - adopting the correct
The easiest method of learning how to adopt a
perfect address position is to start from the groundup. David Leadbetter
recommends first starting with the body erect and the feet approximately a
shoulder s width apart. Then, one bends the knees slightly as if one is
getting ready to sit down on a bar stool - as demonstrated in the following
Address posture - from reference number 3
The correct amount of knee flex can be determined by looking down at one s
knees, and noting that a vertical line passing just in front of the kneecap
will pass through the balls of the foot, or through the junction of the forefoot and
midfoot - as seen in the following diagram. If the vertical line passes in
front of the toes, then the knees are too flexed. If the vertical line
passes through the rear end of the midfoot, then the knees are insufficiently flexed.
Flexed knee position - from reference
As one bends the knees, one should
simultaneously push the hips back so that one creates the appropriate bend
at hip level. It is important to bend at the hips and not the waist. To
accomplish that feat, one should have a distinct feeling that one is
sticking out one s rear-end as demonstrated by David Leadbetter in his
address posture photo. Note that if one bends at the hips, and not the waist, that
the lower back becomes straight, and not rounded and stooped. When one
adopts this straight back posture, one should feel like a diver at the edge
of a swimming pool, who is ready to dive head-first into the pool. Another
visual analogy is the to imagine the athletic position of a football
quarterback who is waiting to receive the ball or a professional tennis
player waiting to receive a serve. What particularly characterises these
static sport postures is a straight lower back, slight bend at the hips and
knees, and a sense of lively readiness in
the legs. The flexed knees should be perceived to be like coiled springs,
that can readily allow the torso and hips to swivel and turn with the utmost
If a golfer has difficulty getting the correct
flex at the hips rather than at the waist, then the following photo may be
Bending at the hips - from reference number
Note that the golfer has placed a clubshaft against the front of his upper
thighs, and he then bends forward at the hips while pressing the clubshaft
firmly against the thighs. This will enable him to stick-out his rear end
and bend appropriately at the hips.
If a golfer has difficulty adopting a straight
back position, David Leadbetter suggests positioning a clubshaft along the
length of the lower back - as demonstrated in the following photograph.
Adopting a straight lower back - from
It is important to realise that a golfer needs to adopt a straight lower back
posture without losing the slight roundness of the upper back. Trying to
adopt a straight back all the way from the hips to the neck results in
overly rigid, and unnatural, straight back back posture.
After a golfer has acquired the correct amount of knee flex, the correct bend at
the waist, and a straight lower back - then he should ensure that his head is is line
with the spine by straightening the neck. Many beginner golfers have an overly flexed
neck at address, because they are looking straight down at the ball. If the
neck is overly flexed, then the chin will impede the rotational
movement of the left shoulder in the backswing and the right shoulder in the
downswing, and thereby disrupt the swing. A golfer should make a conscious effort
to lift his chin slightly - and he may have a distinct feeling that he is
looking down over his upper cheek when looking down at the ball. However, a
beginner golfer shouldn t over-compensate, and over-straighten the neck and
thereby lose the rounded appearance of the upper back in the address
position. A good compromise head position is the position of David
Leadbetter s head in the photo above or the diagram below.
After a golfer has acquired the correct amount of
knee flex, the correct bend at the waist, a straight lower back and a
straightened neck - then the golfer should ensure that the hands hang vertically down from the
shoulders in a relaxed manner when the clubface is placed behind the ball. The golfer should avoid any
feeling that he is stretching out the arms towards the ball, and the
correct arm posture is demonstrated in the following artistic
Shoulder line - from reference number 4
Note that a vertical line passing down from
the middle of the shoulder will pass through the middle of the
upper arm, and pass just in front of the knee cap to hit the ground through
the forefoot. If a golfer adopts this postural recommendation, then he will have
acquired the correct amount of bend at the hips and the
If a golfer bends too much at the hips, then
the vertical line drawn from the middle of the shoulder will pass in front
of the forefoot. He will then note that his weight is not distributed evenly
between the heels and forefeet, and that there is too much weight over the
forefeet. That degree of forward weight distribution can cause a golfer to
become unbalanced during the downswing and predispose the golfer to falling
forward towards the ball during the downswing.
If a golfer bends too little at the hips, then the
vertical line will pass behind the kneecaps to hit the ground in the region
of the rear midfoot. The golfer will then be standing too erect, and there will be a
sense that there is more weight on the heels relative to the balls of one s
feet. Optimally, a golfer s weight should be evenly distributed
between the heels of the feet and the balls of the feet, and he should be able to
lift up the back of his heels slightly without becoming unbalanced if
his body weight is evenly distributed over the feet.
It is interesting to note that there should
be very little difference in the degree of bend-at-the-hip and the degree of
vertical arm positioning when hitting a driver compared to hitting a short
Consider the following photo of the
appropriate posture when hitting a driver, a long iron, and a short iron.
Distance from the ball - from reference
Note that there is roughly the same degree of bend at the
hips slightly more bent-over posture with the short iron and that a vertical line drawn down
from the middle of the shoulder passes just in front of the kneecap as it
passes down to hit the ground in the region of the forefoot. Note that the
arms hang vertically down from the shoulders when using an iron hands are
just inside the chin, and are only minimally stretched forward when using a
driver hands are directly under the chin, or just in front of the chin.
Note that the hands are very close to the thighs at address, and approximately
4-6 from the thighs when using a short iron, and approximately 6-8 from
the thighs when using a driver - and that there is only a 2 difference
between the two extreme hand positions.
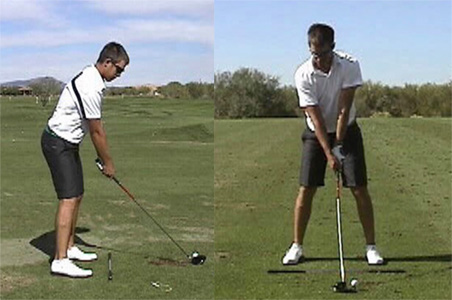
Consider Tiger Woods body posture at address.
Tiger Woods address posture - from
In the first half of the composite image, Tiger Woods is
deliberately adopting an inappropriate for him over-bent posture. Note
that a line drawn vertically down from the midddle of his right shoulder
will pass far in front of his kneecap and hit the ground at his toe line. In
the second half of the composite image, Tiger is adopting his normal and
appropriate for him posture - a line drawn down vertically from the middle
of his right shoulder will pass just in front of his kneecap and hit the
ground under his forefeet. Also, note that his hands are under his chin and
approximately 6-8 in front of his thighs, and that a line drawn back along
the clubshaft towards his body will intersect his body at the level of his
belt buckle. Finally, note that if you drop a vertical line from the back
his rear end tush to the ground, that it passes only a few inches behind
the heel. A perfect posture for the modern, total body golf swing
when using a driver or fairway wood and near-identical to
Aaron Baddeley s address posture.
Now consider Aaron Baddely s posture from a
face-on view using the same address position photo.
Aaron Baddeley address position - from
There are two important features to note-: i Aaron
Baddeley s spine is tilted to the right and his right shoulder is lower
than the left shoulder, and his head is behind the ball; ii Aaron
Baddeley s left hip is slightly higher than the right hip.
This tilted spine postion is best appreciated
when viewing a golfer from behind, as seen in this artistic diagram from Leadbetter s
Tilted spine at address - from reference
These two address postural features are very
important, and this particular positional aspect of the address posture is called the
reverse K position, and it is demonstrated graphically in the following
Reverse K address position - from reference
Note that in this model called the ModelPro, that the
ModelPro has angled his right knee slightly inwards. Not all modern, total
body golfers do that, and Aaron Baddeley seems to have symmetrical knees.
Most importantly, note that the spine is tilted to the right and that the
right shoulder is lower than the left shoulder. This postural adjustment has
two important effects. First of all, it causes the head to move slightly to
the right and move behind the ball. Keeping the head behind the ball
throughout the backswing and downswing is a critical component of a good
golf swing. Secondly, during the backsing, rotating the torso around a
rightwards tilted spine allows the weight to more easily flow to the
right side without any jerky, superadded shift-movements. Thirdly,
notice that with the ball positioned forward near the left heel, and the
hands just forward of center just inside the left thigh, that the
clubshaft is angled slightly forwards - this address position encourages a
slightly upwards movement of the clubhead through the impact zone, which is
an advantage when driving a ball off a tee.
The recommended degree of rightward tilt of
the spine depends on the club being used. A distinct rightwards tilt of the
spine is recommended when using a driver, because a golfer wants the
clubhead to be travelling slightly upwards at the time of ball impact. With
a fairway wood and long irons, a golfer usually wants to sweep the ball off
the turf with a zero/minimal divot. Therefore, the rightwards tilt should be
minimal. With a short iron, the golfer often wants to hit down on the ball
with a descending blow, and excess rightwards tilt of the spine may be a
This next face-on view photo will allow me to discuss
three seperate address position issues -- stance width, weight distribution,
Leadbetter address position - from
First of all, note that Leadbetter flares
both feet open. Many golf instructors recommend a 10-30
degree flaring-out of both feet, because it allows the hips to rotate more
easily during the swing. Flaring the foot open allows the knee to move more
easily in response to rotatory movements, so that the knee can re-position
itself above the foot. This is especially relevant with respect to the left
foot during the downwsing, when the body weight is driven powerfully across
to the left side by an initiating lower body shift-rotation. Flaring the
left foot open allows the left knee to first move laterally and then
straighten, thus supporting the body weight directly over the left foot as
the lower body pivots around an axis centered in the region of the left
Regarding the driver, Leadbetter recommends
that the inner distance between the feet should be equal to the shoulder
Regarding mid-irons, Leadbetter recommends
that the outer distance between the feet should roughly be equal to shoulder
Regarding short irons, Leadbetter recommends
that the outer distance between the feet be less than shoulder width,
but not significantly less than hip width.
Some golfers, who lack flexibility, may personally find
Leadbetter s driver stance width recommendation to be too wide, because i it prevents their
hips from rotating fully during the downswing, and because ii it therefore prevents
easy/complete weight transfer to the left side during the downswing and
Another method of finding the correct stance
width, that takes body flexibility into account, comes from the book Total Golf
Stance width variations - from reference
The Total Golf authors recommend adopting a stance width,
and then turning the body 90 degrees so that the chest and hips fully face
the target. The correct stance width is the stance width that allows the
knees to get together and be in-line and the hips to fully rotate 90 degrees
number 2 in the above sequence of three stance width positions. Stance
width variation number 1 is too narrow and allows the hips to over-rotate,
while stance width variation number 3 is too wide, preventing complete hip
I think that each individual golfer should
experiment with these two stance width approaches to find the best balance
between rock-solid stability and easy hip flow. A stance width that favors
stability over easy hip flow may be preferable when using a driver, while
the opposite bias may be preferable when using a long/mid iron. Most PGA
tour players prefer to keep their lower body quiet when using a short iron,
and they try to avoid excessive lower body movement during their short iron
Weight distribution at address
Leadbetter recommends that the
weight distribution between the two feet right foot relative to left foot
should be with a driver, with a mid-iron and with a short
iron. These recommendations are not really controversial, and many golf
instructors make similar recommendations. Some golf instructors recommend
that the weight be evenly distributed between the feet for all clubs.
Notice that Leadbetter places his hands in
the same position, just left of center and just right of the inner left
thigh, for all clubs. Most PGA tour players routinely place their
hands in a similar position - somewhere between the center of their stance
and the left inner thigh. Notice that, with the hands in this position near
the left inner thigh, that the left arm is straight and roughly in line with
the clubshaft when using a mid-iron, and that the right elbow is slightly
Leadbetter recommends placing the ball just
inside the left heel for the driver ball position A, about 2 inches back of
that position for a 5-iron, and roughly in the middle of the stance for a
short iron ball position B. The total distance from ball position A to
ball position B is only about 3 about the width of two golf balls.
The Total Golf authors recommend a
position approach that relates the ball position to the chest. and not the
Ball position recommendations - from
Basing the ball position on its relationship to the torso
makes sense, because it eliminates the variable effect that varying degrees
of foot flaring may have on correct ball placement when it is solely based on stance width.
An important point about ball position in
these two ball position photographs - note that the head is always behind the ball
irrespective of which club is used. When using a short iron, some golfers
prefer to have their head directly over the ball, and the sternum marginally
ahead of the ball, so that they can hit down on the ball.
However, note that the clubshaft
angle/direction at address varies with different length clubs see
driver, the clubshaft is tilted slightly forwards in the direction of the
target, and this encourages a slightly upward swing path at the point of
ball impact. With a mid/long iron, the clubshaft is tilted only marginally backwards, and this encourages a flattish or slightly descending swingpath in the region of the
ball and a shallow divot. With a short iron, the clubshaft is tilted
backwards, and this encourages a steeper descending swingpath and a deeper
There are no fixed rules when it comes to
ball position, other than the general principle that the ball position
should generally be forward of the center of the stance. I know of no golf
teacher who recommends placing the ball back of the center position closer
to the back foot for standard non-specialised golf shots. Many golf
instructors recommend a fixed forward ball position eg. 3 inside the left heel
for all iron shots, and simply recommend moving the right
foot to vary the stance width, and consequently the ball s relationship to
the right-versus-left foot, for different clubs. There is considerable
logical support for such an approach. For example, when hitting a pitching
wedge, a golfer often wants to strike the ball with a more descending blow,
so that he can produce a high trajectory ball flight with added backspin. If
he positions the ball 3 inside the left heel and brings the right foot
closer to the left foot, so that his stance width is approximately equal to
hip width, then he can easily strike down on the ball while still keeping
his head marginally behind the ball. If he first adopts a stance that
is approximately equal to hip width, and then positions the ball in the
middle of his stance, then it is more likely that the ball will be further
than 3 back from the left heel, and the clubshaft may be angled back too
much. This greater angling back of the clubshaft causes the clubface to lose
loft, and it also causes the clubface to become more closed, thus aiming
left of the target see next photo. Golfers should be aware of this
potential problem when using short irons.
Closed clubface secondary to an over-back
angled clubshaft - from reference number 8
An individual golfer may find the best ball
position for his individual full swing by personal experimentation - swinging different
clubs and seeing where the divot starts which roughly indicates the lowest
point of the swingarc. The ball should be positioned just behind the back
end of the divot. Golfers who have a significant hip slide during the early
downswing will need to position their balls more forward, compared to
golfers who have little hip shift in the early downswing. Most golfers will
probably find that their optimum ball position for most fairway clubs is
approximately 3-4 inside the left heel. Golfers with a large amount of hip slide
or leg drive in the early/mid downswing have to position the ball more
forward, and they may even decide to adopt
Ben Hogan s approach to ball positioning - he placed the ball just inside
the left heel for all clubs, and he moved his right foot forward and
closer to the ball line for shorter clubs see next photo.
Ben Hogan ball positioning - from reference
A few more points about the body position at
At address, the arms should be held close
together in front of the body, and the back of each elbow should point at
each related hip. One should avoid allowing the elbows to point
sideways away from the body, so that the antecubital fossa hollow in the
front of the elbow of each elbow faces towards the opposite elbow s
antecubital fossa. The antecubital fossa of each elbow should face halfway
forward towards the ball, and a line drawn from each antecubital fossa
should intersect in front of the body, as demonstrated in the following
Elbow and forearm position - from reference
Finally, note that the right forearm is
closer to the ball line than the left forearm, and that one can see the left
forearm sticking out below the right forearm in the down-the-line view. If
the opposite situation occurs, and the left forearm is higher closer to the
ball line than the right forearm, then this will encourage a too-inside
swingpath in the early backswing takeaway. Some professional golfers keep
the elbows and the forearms in perfect symmetrical alignment when driving, because it
encourages a sweeping down-the-line swing action, rather than a steeper
Body alignment refers to the positioning of the body relative to the
The body should be aligned parallel to the ball-target line
for all standard shots, and each section of the body feet, knees,
thighs, hips, shoulders should be perfectly parallel to the ball-target
line - as demonstrated in the following artistic diagram.
Body alignment - from reference number 4
The most important part of the body that has
to be parallel to the ball-target line are the shoulders. The direction the
arms will swing across the front of the body during the downswing is very
much influenced by the direction of the shoulder line, and the arms will
tend to follow the shoulder line. If the shoulders are pointing to the right
of the target, then it is very likely that the arms will swing from
in-to-out across the front of the body during the downswing. If the
shoulders are pointing to the left of the target, then it is very likely
that the arms will swing from out-to-in across the front of the body during
Aiming refers to the method of aligning one s
clubface and body relative to the ball, so that the clubface faces the
target, and the body is subsequently aligned parallel to the ball-target line.
The best method of aiming is to stand about 6-12
feet directly behind the ball and then look down-the-line at the target.
This allows one to see the ball-target line in one s mind without any
distortion that occurs if one attempts to define the ball-target line
from a side-view. Many golf instructors then suggest that one choose an
intermediate target along the ball-target line, about 3-6 feet in front of
the ball eg. divot mark, clump of grass. Then one should move back to an
address position opposite the ball, and place the clubshaft at an
approximately 90 degree angle to the ball, so that the clubface faces the
intermediate target. If the clubface faces the intermediate target, then the
clubface must be perpendicular to the ball-target line.
Leadbetter aiming the club - from reference
When aiming the clubface, one should look at the lower 2-3
groove lines of the clubface, and ensure that those groove lines are at
right angles to the ball-target line. Don t look at the top of the clubface,
because the top of the clubface is often angled in such a manner that it is
not parallel to the clubface s groove lines. Also, note that the clubshaft
may not be at right angles to the the ball-target line when the clubface is
at right angles to the ball-target line - because clubs have varying degrees
of offset see photo. It is the clubface that needs to be at right
angles to the ball-target line, and not the clubshaft. When one has the
clubface s groove lines perpendicular to the ball-target line, then one
should build one s stance around the clubshaft so that one is standing along a
is perfectly parallel to the ball-target line. It is very important to
realise that one s stance and body knees, thighs, pelvis, shoulders is
positioned parallel to the ball-target line, and that one should not
look at the target to verify correct alignment when standing alongside the
ball in the address position. If one looks up at the target, the target
should appear to be a little to the right, because one is viewing the
target from an eye-viewing position that is approximately 2-3 feet left of the
ball-target line. Resist any inclination to change your stance/body
alignment so that you feel that you are directly facing the target,
because this will cause you to aim right of the target by approximately
10-20 degrees. The correct reference point for aligning the stance/body when
standing alongside the ball is the ball-target line which was previously
established when standing directly behind the ball, and not the
Shoulder alignment - from reference number
First of all, note that the feet are placed parallel to the
ball-target line. Then one should ensure that the rest of the body knees,
thighs, hips, shoulders is parallel to the ball-target line. Note that the
ball is aimed at the flagpole, which is equivalent to aiming at point X.
Note that the feet and shoulders appear to be aiming at point Y, which is far
left of point X. This is a critical point, and when one turn one s
head to look at one s left shoulder, it should appear to be be pointing well
left of the target. In fact, one shouldn t easily see the left shoulder out
of the corner of the left eye when one looks directly at the ball. If one
clearly sees the left shoulder in one s left eye s peripheral visual field when looking
at the ball, then it usually means that one is misaligned, and that the
shoulders are in a closed position and often pointing 10-20 degrees right of the
target. Many beginner golfers face 10-20 degrees right of the target
because they take aim at the target when standing sideways alongside the ball, and they subsequently, and mistakenly, align
their shoulders to face the target. To avoid that problem, a golfer should always
pre-visualize the ball-target line and the stance/body line when standing 6-12 feet
directly behind the ball, and then ensure that the two lines are parallel
to each other. The golfer should look to see where the body line will
eventually be pointing point Y and ensure that his shoulders are facing point Y
when he is finally in the completed address position. As a rough guide,
point Y will appear to be approximately 7 feet left of point X for
every 100 yards of distance. Therefore, if one is aiming at a target 300
yards away, the left shoulder should appear to be pointing at a point that
is approximately 20 feet left of the target.
Many golf instructors state that a golfer
should imagine that the stance line should be parallel to the ball-target
line, and that both lines should point at the target - like railway tracks
Alignment technique - photos from reference
The author of the book Lupo recommends that a golfer should
place a club on the ground at the projected stance line so that
the club points at the target as seen from behind - see image 1. He
then states that a golfer should place his feet on the
established stance line, which means that the shoulders/feet are
facing the target at address - image 2. I think that this maneuver is a
major mistake. If the feet and shoulders are facing the target at address,
then the true alignment will likely be in the direction of the
red arrow in image 3 - about 10-20 degrees right of the target. I
highly recommend that golfers adopt my alignment recommendations as
demonstrated in image 4. First establish the ball-target line by standing
directly behind the ball. Second, locate an object eg. tuft of grass or
divot mark about 6 feet away on the ball-target line - red dot, labelled
X. Third, stand alongside the ball, and place the clubhead
behind the ball so that the clubface short blue line faces point
X. Fourth, make sure that your foot stance line is perpendicular
to the clubface, which means that the stance line is parallel to the
ball-target line - yellow line. Fifth, make sure that an extension of the
stance line yellow line points well left of the target double-headed red
arrow - as viewed when glancing out of the corner of the left eye at the
left shoulder. As a rough approximation, the width of the double-headed red arrow
at the target should be about 7 feet for every 100 yards of distance.
Another way of thinking about, and adopting,
the correct alignment is as follows-:
At address, the stance/shoulder line should
be parallel to the ball-target line and about 3 away - like two railway
tracks. However, when looking at two railway tracks as they proceed into the
far distance, they appear to converge on a single point at the far horizon.
That causes a golfer to incorrectly think that he can aim his shoulders at
the target eg. 250 yards away and be correctly aligned. However, that s
not true. One needs to first establish an imaginary ball-target line when
standing behind the ball, and then simultaneously imagine a stance line 3
away from the ball-target line, where the stance line is parallel to the
ball-target line. Then, remembering the stance line s position in one s
mind, one should move around to the side of the ball and place one s
feet on that stance line. Then, if one looks out of the corner of the left
eye at the left shoulder - when standing in the address position - it should
appear to be aimed well left of the target about 7 feet for
every 100 yards of distance and this is due to parallax distortion when one
mentally projects the imaginary line between the left eye and the left
shoulder into the far distance. The 7 number is an approximation.
Here is another method of understanding this perspective
distortion - that is based on a golfer s viewing position.
The top diagram represents a golfer standing on the
ball-target line with his head directly over the ball. The small circle
represents his head and the large oval represents his shoulders as viewed
from above. The red dot represents a target on the ball-target line that is
200 yards away. The blue dot represents a target on the ball-target line
that is 100 yards away. From his viewing perspective on the ball-target
line, his shoulders are in a straight-line relationship to the two targets.
The bottom diagram represents the same golfer - who has
stepped back 3 feet, while keeping his shoulders parallel to the ball-target
line. Now, when the golfer looks at the two targets from his
new viewing position on the stance line, they
appear to be to the right. The blue target appears
to be more degrees to the right than the red target see the blue and red
arrows. If he turns his head marginally to the left and looks at his left
shoulder out of the corner of his left eye, to
assess where his shoulders are pointing, it will appear that his
shoulders are pointing to the left of the two targets yellow arrow.
Address setup and alignment tips
presented in a question-and-answer format :
1. Question: Is there an advantage to
Answer: An open stance exists when the
body is not aligned parallel to the ball-target line, but the right side of
the body is aligned closer to the ball-target line than the left side of the
body. Advanced golfers frequently often adopt this posture, especially on
short iron shots. An open stance limits hip rotation to the right during the
backswing and thereby keeps the backswing more compact, controlled and less
loose. It also allows for a freer, smoother, more fluid flow of the
mid-torso through the impact area during the downswing/early followthrough,
because the hips can more easily rotate to the left when the stance is open.
An open stance encouraging forward hip movement during the downswing is
useful when using an abbreviated backswing for a short iron shot eg. half
backswing to the 9 o clock position with a wedge because there is less
forward momentum generated from a half-swing backswing position, but one
still needs to have a complete followthrough on half-wedge shots. Some golf
instructors therefore encourage golfers to routinely place their right foot
1-2 closer to the ball-target line, compared to their left foot, when
hitting short iron shots that have an abbreviated shortened backswing.
2. Question: When do advanced golfers
deliberately use a closed stance.
Answer: A closed stance exists when
the left side of body is closer to the ball-target line than the right side
of the body. An advanced golfer may adopt this stance when he deliberately
wants to draw the ball. A closed stance predisposes the backswing to occur
along a more inside track, which subsequently causes the downswing swingpath
to approach the ball from more inside-the-line. A closed stance also impedes
easy body rotation to the left during the downswing/followthrough, thereby
encouraging an in-to-out downswing path, rather than an in-to-in swingpath.
An in-to-out downswing path combined with a neutral clubface pre-aimed down
the ball-target line will produce a draw ball flight pattern. A closed
stance is disadvantageous for standard full shots when one doesn t want to
delberately hit a draw, because it impairs the
forward rotation of the torso through the impact zone. If the easy rotation
of the torso to the left is impeded during the downswing, then the arms
will likely outrace the body and whip across the body to the left in the early
followthrough. This will produce unwelcome pulled shots and/or duck hook
flexibility affect stance width choice.
Answer: Body flexibility has a huge
effect on stance width choice. Golfers who have very flexible hips and legs
can adopt a wider stance when using a wood or long iron, because they have
the flexibility that will allow the hips to fully rotate through the shot
without any mechanical impedance. A wider stance allows the golfer to
generate more power and hit the ball greater distances. Golfers with less
body flexibility in the mid-torso and legs should adopt a narrower stance.
They may think that they are giving up some power-generating ability by
adopting a narrower stance, but an
inability to easily move the torso through the shot to a complete finish
position may be a bigger power-drain.
4. Question: Why is it advantageous to
also move one s sternum, as well as the right foot, forward when hitting a
Answer: If one adopts a fixed ball
position for all iron shots that is approximately 3 inside the left heel,
then one would normally move the right foot closer to the left foot in order
to achieve a narrower stance width distance between the outer feet approximately equal to hip width when
hitting a wedge shot. If one doesn t move the sternum forward at the same
time, then the sternum will be behind the ball and it is difficult to
achieve a descending ball strike, which is often desirable with short iron
shots. By moving the sternum to a position where it is marginally
ahead of the ball, it becomes easier to achieve a descending ball strike.
5. Question: Why is it advantageous to
point each elbow at their respective hip joint in the address position.
Answer: If the left elbow points
outwards away from the left hip joint at address, then the left forerarm has
adopted an over-rotated position. That will predispose one to an excessively
flat backswing plane in the early takeaway. If the right elbow points
outwards away from the right hip joint at address, then it is difficult for
the right elbow to fold naturally, like a hinge in a door, in the early
6. Question 7: Jack Nicklaus, like Ben
Hogan, also positioned his ball just inside the left heel for all
clubs. Why do modern PGA tour players, like Nick Faldo, prefer to position
their ball about 3 inside the left heel for all fairway clubs.
Answer: Jack Nicklaus had very
powerful legs and a tremendous leg drive in the downswing and he often ended
up with his left leg bowed slightly outwards at impact - see the next
Jack Nicklaus swing - from reference number
Nick Faldo, like most present-day PGA tour players, do not
attempt to drive their legs aggressively forward like Nicklaus. They pivot around a
downswing axis centered in the region of the left armpit, and the lowest
point of their downswing arc is well inside the left heel for fairway clubs.
The following diagram demonstrates where Nick
Faldo likes to position his ball for all fairway shots - 3 inside the left
Faldo ball position - from reference number
Nick Faldo routinely positions his ball 3-4 inside the left
heel for all fairway clubs top diagram. He avoids positioning the ball
further forward, because it would cause him to pull his right shoulder
forward to reach the ball at address, and this would predispose hin to hitting the ball from a
slightly outside-in direction, thereby causing the ball to pull left left
bottom diagram. He especially avoids positioning the ball too far back,
because he wouldn t have time to square the clubface during the downswing,
and this would result in weak, pushed shots right bottom diagram.
7. Question: Should the club lie flat
Answer: No. The club should have a
slight upright lie at address. At the impact position, the hands will be at
a slightly higher position than they were at address, and the clubshaft
angle will be slightly steeper. That higher hand position will cause the lie
to be slightly flatter at impact this issue is discussed at greater length
in the impact section of this critical review.
8. Question: If the right hand is
lower on the grip than the left hand, doesn t that pull the right shoulder
forward, thereby making it impossible for a golfer to square the shoulders
Answer: That problem is avoided
because the golfer tilts his spine slightly to the right at address. That
drops his right shoulder downwards - see the following diagram.
Shoulder tilt at address - from reference
When the golfer tilts his spine slightly to the right at
address, that causes his right shoulder to drop down, and he can reach down
to the club without having to bring his right shoulder forwards. It also
causes his hands to move away from a centralised position between the thighs
to a final hand position closer to the left thigh.
2. A Swing for Life. Nick Faldo.
3. 100 Golf: Unlocking your true golf
4. The Golf Swing. David Leadbetter.
5. Total Golf. Mike Adams and T.J. Tomasi.
6. Swing Like a Pro. Ralph Mann and Fred
7. Tiger Woods: How I Play Golf. Tiger Woods.
8. Your Perfect Swing. Jim Suttie.
9. Five Lessons: The Modern Fundamentals of Golf. Ben Hogan.
10. The Complete Encyclopedia of Golf. Edited by Paul Foston.
11. How to Master a Great Golf Swing. Maxine
12. Golf my Way. Jack Nicklaus.
13. The Winning Formula, Nick Faldo.
Swing Extremes: Driver Setup. In addition, try the following drill, which is an easy way to help you set up behind the ball at address with the driver.
How to Address the Golf Ball
Here s how to make sure you are address the ball in a way to give you a greater chance of success: 1. Alignment – It all starts with your alignment.
Driver Shaft Position at Address. Mon, and setup are just a few of the things that must be correct before you can become a consistent driver of the golf ball.
Address Setup: Stance, Posture and feet aligned more square relative to the ball-target line at address just inside the left heel for the driver ball.
Many beginning or high handicap golfers know that they are going to have to hit balls on the range in order to improve, but few of them realize how important the setup is. The swing starts with how you address the ball. If you setup correctly you can hit a good shot even without your best swing. If you setup incorrectly, a great swing will still result in a poor shot.
What can a proper setup help you achieve. Addressing the ball the right way keeps you in balance through your entire swing, helps you generate power, lines you up to your target, and increases the consistency of your contact. All of those things sound pretty great right.
Here s how to make sure you are address the ball in a way to give you a greater chance of success:
1. Alignment - It all starts with your alignment. Everything on your body should be aligned parallel to your target. That includes your feet, knees, hips, forearms, shoulders, and eyes. Start out standing behind the ball and drawing an imaginary line to the target. Then try to find an intermediate target a few feet in front of your ball then aim your club up with it. Don t move the club until you have your feet in place. Think about your feet and the ball being on different sides of a railroad track running straight down your line.
2. Feet - If you want to be balanced throughout your swing then make sure your feet are close to shoulder width apart. You might need to spread them out a little further for the longer shots and you can narrow them a bit for the close ones. Your left foot needs to be slightly open to allow you to turn through the shot, while the back foot can be squared towards the target. Your weight should be on the balls of your feet, not on the heels or on the toes and balanced evenly between the two.
3. Ball Position – Your swing is a natural arc and that arc has to have a bottom. You want to make sure the bottom of your natural swing is where the ball is placed in your stance. If your weight is evenly balanced then the ball should be
placed in the dead middle of your stance for short irons wedges, 9, 8, 7. Note that you should check the back of your heels, not your toes. If you open your front toe slightly placing the ball in the middle will move it forward slightly and will lead to either fat shots or a compensation in your swing to get to the ball. For the longer irons, hybrids, and fairways move the ball slightly forward about the width of the ball in your stance, then your driver should be placed around 2-3 inches away from your left foot. Take a look at the photo to the left I found describing the correct ball position.
4. Posture – The correct posture is difficult to describe. You want to flex your knees a little bit but avoid squatting down. Instead of thinking about bending over at your hips, you should move your pelvis back. Your back and head should be straight. The front of your shoulders should be over the tips of your shoes. Take a look at the photo to the left I found that demonstrates good posture.
Dec 16, 2014 Video embedded Set Up to Hit the Ball on the Center of the Face Most golfers set their driver on the ground at address. This results in a high percentage of driver.